Applying new grip tape is an incredible way to revamp an older skateboard and to give it a fresh new coat of grip.
If you haven’t already – make sure to check out our guide on How to Remove Grip Tape first from your old board.
It’s super, super important to make sure that all pieces of the old grip have been removed from your board before you start applying any new grip. This will ensure a smooth surface for the new grip, and no unseemly or uneven bubbles on the surface.
Once you already have a naked, pristine board with all of the old grip removed (again – ALL of the old grip) and only the wood showing – follow the below 8 simple steps to learn how to apply some new grip.
How to Apply Grip Tape – Step One:
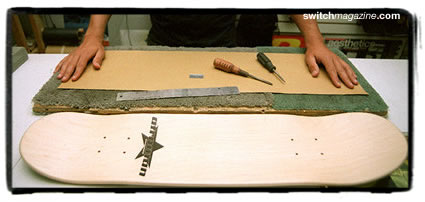
The first thing you should do before you start to apply new skateboard grip tape is to get all of the equipment / tools that you will need.
You will need the following:
– 1 straight edge (e.g. a ruler),
– 1 screwdriver,
– 1 razor / sharp edge / knife (e.g. the same one you may have used to remove your old grip should do the trick here),
– 1 and a grip tape along with the skateboard you plan to grip. If you haven’t purchased new grip tape yet, click here to get some
Step Two:
If you want a strip cut out of your grip (so you can see the top graphic or just to look cool) use the straight edge to cut that now.
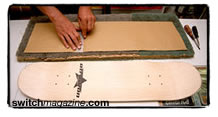
Step Three:
Peel the grip tape from its backing properly. Make sure to do this cautiously and to not hurry. A little hassle and you will damage the grip tape so make sure to be careful and to take your time.
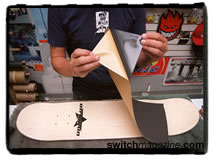
Step Four:
Starting from the center of the skateboard, press the grip tape down. Slowly apply the rest of the grip tape down onto the broader surface of the skateboard.
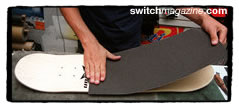
Step Five:
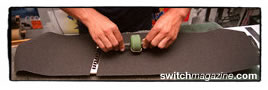
After all of the grip tape is down / has been applied to the surface of the wooden board, use a skateboard wheel (or your thumb will work) to smooth out the entire surface and to make sure all of the air bubbles have been pressed out.
(This is why it was key to remove all of the old grip during the prior removal process).
Step Six:
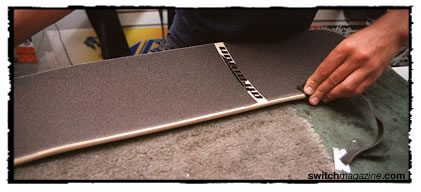
Use the screwdriver to rub a nice little edge along the skateboard. This edge will be the outline used to cut the grip tape.

Step Seven:

Use the blade to cut the grip tape along the line you made with the screwdriver. Make sure to be careful at this step – to not only ensure your own safety, but to also make sure you have a clean cut flush with the edges of the skateboard.
Step Eight:
Use the scraps to smooth the edge of the grip tape along the sides of board. Now you should be good to go – congrats on applying your fresh, new, grippy set of tape!
So go put on your trucks and go skate with your fresh new grip.
Later switch.
If you are here reading – How to Apply Grip Tape – then probably you must have either removed the previously applied grip tape from your board or are still looking forward to remove.
Here is the simple step by step guide on – How to Remove Griptape from your Skateboards and Longboards. Give it a look.
Make sure to check out some of the other articles on our site to learn much, much more about how to take care of your skateboard.